Last year, the local French Society’s Bastille Day Masquerade and Dinner presented a rare opportunity to travel further back in time than the Victorian era. Not having a dress of my own to wear I was fortunate that Liane had a spare that I could borrow.

Afterwards, I started thinking about attempting my own and starting pinning a bunch of fashion plates and dresses onto a Pinterest board. Almost straight away I knew that I wanted to have a purple dress but nothing more than that.
Having other projects to work on I completely forgot about anything 18th century until I started thinking about and planning those for this year. By this time, the American Duchess Simplicity Robe a la Francaise pattern had been released so I decided that since I was completely new to the 18th century, this pattern along with the American Duchess book it would hopefully be a good choice.
The yardage of fabric required seemed absolutely staggering – much more than needed for a Victorian dress – but fortunately my local fabric store had a sale and I picked up my lavender taffeta at half price. But which other colour should I use with the lavender?
The pink available was too bubblegum-y so pink and lavender was out and none of the other colours were really appealing to me. Then my eye caught on a bolt at the back. Teal. I wondered if that might work but wasn’t really sure. I asked Liane what she thought and while she deliberated I pulled out my phone and opened the Pinterest app.


Well, what do you know? I had pinned, months earlier, light purple dresses with teal – or close enough going by the colour on my phone. I was sold. Unfortunately, there was hardly a metre of fabric left and my heart sank. Until the sales assistant rang the head store and was able to secure enough to be shipped down for me.
Within days I had enough fabric and then began the slow process of slowly acquiring each piece of the puzzle needed before the dressmaking could begin. That meant ordering coutil and synthetic whalebone for the stays, purchasing the American Duchess book, and their patterns, as well as acquiring other elements of the ensemble such as earrings from Dames a la Mode, and finding ostrich feathers in the right or just-about-the-right colours.
Over the course of about three weeks I got a lot of mail…


With one final trip to Spotlight to complete my ‘list of ingredients’, I was ready to begin. Starting with the undergarments first, the very best place to start. You can read about my making of those here.
I started with the petticoat first, cutting out the teal taffeta pieces. I quickly discovered that the fabric was quite slippery and wasn’t going to hang nicely. To try and fix this I ended up flatlining the panels with silk organza and while it didn’t make it act perfectly, it certainly improved the way the petticoat would sit.
Before assembling the front panels I decided to add the trim first so that meant spending a couple of evenings after work cutting out scallops with the scalloped pinking shears I had bought from Amazon. Scallops on scallops. Scallop Inception?


It was pretty easy to gather the strips of trim with my beloved ruffler foot so it didn’t take too long before I could attach the trim to the front petticoat panel. I’m pretty sure that I managed to pin them on fairly straight before sewing them to the panel.


The taffeta was proving itself quite prone to fraying so I ended up using French Seams to assemble the petticoat. Once it was all sewn together I pinned twill tape to the front and to the back parts of the petticoat and stitch them down before hemming it. Despite it taking a little longer to sew up because of the French Seams and the fiddling about with the trim placement I was actually surprised just how easy it was to make up an 18th Century skirt.

With the petticoat finished it was time to attempt the robe. This was definitely the one part of the whole outfit that I was the most nervous about. It just seemed so complicated and different from my Victorian projects. I definitely procrastinated by cutting out the robe trims and cutting more scallops on scallops. I also cut out the sleeve pieces and worked on those too. But, when that was done I couldn’t procrastinate any more. I was starting to run out of time and could see Bastille Day on the horizon…


There was nothing to be done but finally bite the bullet and began cutting out the pieces. My entire floor disappeared under the fabric as I did this – you definitely need quite a bit of space to cut this pattern out!
It took me a while to figure out the pleats on the front pieces so that the robe would sit nicely over the panniers. I’m actually not sure if I actually ended up pleating them in the correct direction or not. Fortunately, even if I got it wrong, it still seems to work so it’s definitely time for that annoying little voice in my head to shut up about it now.
It took me a couple of goes to get the pleats in the back panel to work as well but that wasn’t as stressful to figure out. Once that was done and stitched across the top to secure the pleats it was time to join it up to the rest of the robe. I also ended up using French Seams for this because I was noticing that this taffeta too was also fraying more easily than I would have liked.
Up until then I really couldn’t see where this was going but finally, I could put what I had on my mannequin and could see that it was actually starting to look like something. There was still a long way to go but it was nice to see that it seemed to be heading in the right direction.

The next step was to cut out and make up the lining. This was definitely a construction step I haven’t come across before in my Victorian sewing (I’m used to just flatlining everything). Making that up was pretty simple but it took me a couple of goes to line it up with the robe before sewing them together.
It was pretty cool to see how adding the lining changed how the robe sat and how easily the fit could be manipulated by changing how tightly the ribbons were tied at the back. I ditched the sewing machine for a bit to sew the waist seams together by hand and to add some stitching at the back so the lining wouldn’t keep revealing itself.
For the stomacher, I flatlined the front pieces of taffeta with coutil for structure and strength. Then I sewed both the front pieces to their corresponding back pieces of taffeta, turned them through and slip stitched the openings closed. I attached them to the robe and then had the fun job of trying to line up the hooks and bars (I may have had to adjust a few of them after a later fitting).
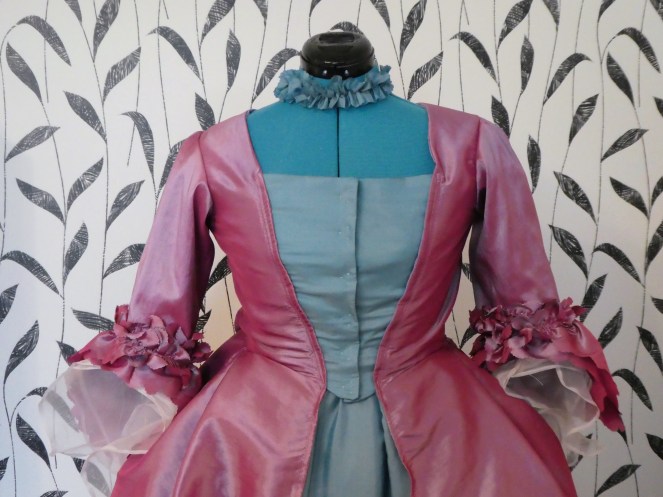
I hemmed the robe and suddenly, it became very much like a case of ‘…and here’s something I prepared earlier’ as I had already constructed the sleeve flounces, had ruffled the trims, and I had already made up the double bows. Of course, trying to arrange the wide trim on the robe, and to make both sides look even was definitely harder than I thought. I could get one side looking all even and lovely but the other side, while looking nice enough on its own, was nowhere near symmetrical!
Eventually, they ended up looking even enough and I valued my sanity too much to keep trying to make them perfectly aligned. I sewed the sleeve ruffles on, along with the stacked silk organza sleeves that I hadn’t attempted to draft from the American Duchess book. All that was left to do then was to add the double bows and I was done!


I ended up taking the bows off the sleeves and adding them to the stomacher because they were very annoying when I tried to bend my elbows. And the stomacher didn’t look completely finished to me with just three bows on it. So, I guess that turned out to be a win-win when I shifted them all to the stomacher =)
And, I somehow managed to finish with a few days before Bastille Day so I was able to put my feet up and relax for a bit before the Masquerade Dinner (that post is coming soon!). Phew! Next time I plan on visiting an era I’m not so familiar with or need to also make undergarments for I am going to make sure that I have more than two months to go…

I looove the colour combination! I’m also glad (? ish?) to see I wasn’t the only one whose petticoat ended up being longer than the gown. Did that still happen when it was worn?
LikeLike
Oh good – it wasn’t just me! It wasn’t so bad when being worn, fortunately, but it does bother me a bit. If I make it up again I’m definitely going to alter the pattern so it doesn’t happen again…
LikeLike
Good to know! (I should also mention that I made the petticoat based on measurements and not the pattern, but between measuring the pattern and referring to the book I came up with the same number. I wouldn’t have minded as much but I had to use “filler” fabric for the sides and back, it def would have shown! I shortened my petticoat 4″ to keep it above the hem of the dress.) I made mine as a test run before cutting into my silk (deep breaths), I will be sure to account for it before diving in. Thanks!
LikeLiked by 1 person