After making the Antique Rose outfit I had plans to make an Eton Jacket to go with it so that I could mix and match and create a second look. It has taken me a little while to get around to doing so but over the last two weekends, I set myself the task of starting and completing it. And I actually saw it through!
As all sewing projects go, I started with a mockup to check the size and that was pretty easy and straightforward. It went together a lot faster than previous mockups that I’ve made because there’s not precise fitting-to-the-body like a boned bodice. I was actually surprised at just how quickly I ended up with a completed mockup and could start cutting out my fabric.
Cutting out my actual fabric took twice as long because I was flatlining it. Each pattern piece is two layers of broadcloth (though the collar and sleeves are flatlined with lawn cotton instead – same as the skirt). Even so, it didn’t take forever and before long they were ready to be assembled.


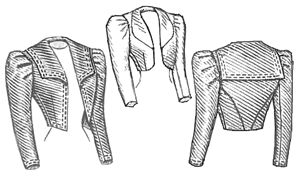
Once the main pieces were assembled I turned my attention to the collar. I was quite undecided on which style collar to choose but ended up going for the square because I figured that it was easier to add braid to, and I wanted to carry some of the braid element from the skirt up into the jacket.
I tried out a few different ideas with the braid on the collar, trying to decide what would look the best. The double braid was giving me sailor vibes and I was very tempted but I figured that since the braid around the skirt is a single line then it would probably make more sense to stick with a single line design (and add a sailor style Eton Jacket to my long list of future projects…).


I traced the design onto a copy of the jacket pattern and pinned it to the collar. After sewing through the design with a white thread so I could see where the braid was supposed to go I machine stitched it on. Once that was done I could sew the collar onto the jacket.


My next task was to cut out the sleeves and to flatline those with lawn cotton. After I had assembled them I hand-sewed a row of braid to each cuff. Once completed, I added them to the jacket, only to realise that I had got ahead of myself and had to un-add them. The only advantage to making that mistake was that I could see how they were sitting and see that they weren’t sitting as nicely as I was hoping.
So when I cut out the sleeve lining, I added some leftover organdy to the top of the outer sleeve pattern so that the sleeves would get a little more oomph. I sewed the sleeves to the sleeve linings and then attached them to the jacket and definitely saw some difference.

Attaching the lining to the jacket was an interesting experience as my jacket transformed into a somewhat lumpy looking cushion with the armscyes looking like eyes. That was motivation enough for me to sew the lining in and turn the jacket out the correct way. Then all that was left was to attach the lining to the armscyes and then, suddenly, it was done!


It’s a lovely jacket!
LikeLike
Thank you so much =)
LikeLike